
Emulating Embedded Linux Systems with QEMU
1. Introduction
Embedded software development relies on embedded hardware devices, such as development boards, external module devices, etc., but if the debugging work has nothing to do with peripherals, only the kernel debugging can be simulated using QEMU without purchasing hardware.
It’s available for Linux and Windows hosts and emulated PowerPC, ARM, MIPS, and SPARC targets. QEMU takes the approach of providing a minimal translation layer between the host and target processor. The host processor is the one running the emulator, and the target processor is what’s being emulated.
The following is a detailed introduction to the process of setting up QEMU development environment.
2. Environment
2.1 Used environment
* Ubuntu-18.04.1
OR:
* PC:Windows10
* Virtual Machine:VirtualBox-5.18
* Virtual OS:Ubuntu-18.04.1
* Simulated development board: vexpres
2.2 Tools used when setting up the environment
* qemu-4.2.0
* linux-4.14.172 (Linux Kernel)
* u-boot-2017.05
* busybox-1.31.1
* arm-linux-gnueabi-gcc
Put all related files in /home/joe/qemu
3. Install cross-compilation tools
# sudo apt install gcc-arm-linux-gnueabi
Check if the installation is successful
| $ arm-linux-gnueabi-gcc -v
Using built-inspecs. COLLECT_GCC=arm-linux-gnueabi-gcc COLLECT_LTO_WRAPPER=/usr/lib/gcc-cross/arm-linux-gnueabi/7/lto-wrapper Target: arm-linux-gnueabi Configured with: ../src/configure -v –with-pkgversion=’Ubuntu/Linaro 7.5.0-3ubuntu1~18.04′–with-bugurl=file:///usr Thread model: posix gcc version 7.5.0(Ubuntu/Linaro 7.5.0-3ubuntu1~18.04) |
4. Configure and Compile the Linux kernel
4.1 Download Linux Kernel
Download the required kernel version from www.kernel.org.
Here I download the relatively latest long-term supported kernel version linux-4.4.157
wget https://cdn.kernel.org/pub/linux/kernel/v4.x/linux-4.4.157.tar.xz to /qemu directory
4.2 Unzip the Linux kernel
# tar xvJf linux-4.4.157.tar.xz
4.3 Compile Linux Kernel
// Enter the kernel source file directory
# cd linux-4.4.157
make CROSS_COMPILE=arm-linux-gnueabi- ARCH=arm vexpress_defconfig
make CROSS_COMPILE=arm-linux-gnueabi- ARCH=arm menuconfig
If running menuconfig shows that the ncurses package is missing, just run the following command to install it)
$ sudo apt-get install libncurses5-dev
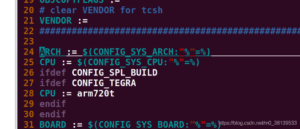
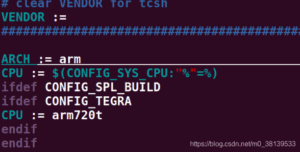
Enter the menu configuration and make the following settings
![]()
![]()
Compile with cross toolchain
![]()
After successful compilation, Generate a kernel image file under the directory
arch/arm/boot, zImage and dtb can be copied into a separate folder for convenient use
![]()
5. Install QEMU Tools
5.1 Install QEMU
* wget https://download.qemu.org/qemu-4.2.0.tar.xz
* tar xvJf qemu-4.2.0.tar.xz
* cd qemu-4.2.0
5.2 Install dependent packages before configuring QEMU
# apt install zlib1g-dev
# apt install libglib2.0-0 libglib2.0-dev
# apt install libsdl1.2-dev
# apt install libpixman-1-dev libfdt-dev
In order to prevent the files from being messy after compilation, create the builder directory as the intermediate target path for compilation.
Configure, compile and install QEMU.

5.3 Configure QEMU to support all boards under the arm architecture
# ../configure –target-list=arm-softmmu –audio-drv-list=
If pixman is missing when the following prompt appears,
use sudo apt-get install libpixman-1-dev to install it.
5.4 View QEMU version

5.5 View development boards supported by QEMU
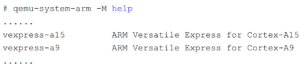
5.6 Run QEMU
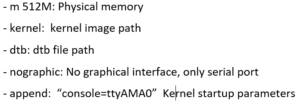
# qemu-system-arm -M vexpress-a9 -m 512M -kernel ./zImage -dtb ./vexpress-v2p-ca9.dtb -nographic -append “console=ttyAMA0”
OR:
$pwd
/home/joe/qemu
# qemu-system-arm -M vexpress-a9 -m 512M -kernel linux-.4.157/arch/arm/boot/zImage -dtb linux-4.4.157/arch/arm/boot/dts/vexpress-v2p-ca9.dtb -nographic -append “console=ttyAMA0”
In order to better testing and start qemu, you can create the startup script start.sh, and give the script permission to run chmod +x start.sh
#!/bin/bash
qemu-system-arm \
-M vexpress-a9 \
-m 512M \
-kernel /home/joe/jemu/linux-4.4.157/arch/arm/boot/zImage \
-dtb /home/joe/jemu/linux-4.4.157/arch/arm/boot/dts/vexpress-v2p-ca9.dtb \
-nographic \
-append “console=ttyAMA0”
6. Make a root file system
Use busybox to make a simple root file system.
6.1 Download busybox tool
Download busybox from https://busybox.net/downloads/
# wget https://busybox.net/downloads/busybox-1.31.1.tar.bz2
# tar xjvf busybox-1.31.1.tar.bz2
# cd busybox-1.31.1
# make defconfig
# make CROSS_COMPILE=arm-linux-gnueabi-
# make install CROSS_COMPILE=arm-linux-gnueabi-
The following information is prompted, indicating that the installation is successful.
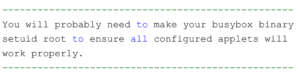
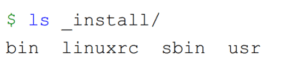
After the installation is complete, the generated target file defaults to the ./_install directory.
6.2 Generate root file system
6.2.1 compile and install busybox
# mkdir rootfs
# sudo cp -r _install/* rootfs/
6.2.2 Add glibc library, add loader and dynamic library in the root file system
# sudo cp -r _install/* rootfs/
# sudo cp -p /usr/arm-linux-gnueabi/lib/* rootfs/lib/
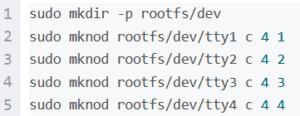
6.2.3 Create 4 tty terminal devices (c stands for character device, 4 is the major device number, and 1~4 are the minor device numbers respectively)
6.3 Make SD card file system image
6.3.1 Generate an empty SD card image
# dd if=/dev/zero of=rootfs.ext3 bs=1M count=32
6.3.2 Format SD card as exts file system
# mkfs.ext3 rootfs.ext3
6.3.3 Burn rootfs to SD card
# sudo mount -t ext3 rootfs.ext3 /mnt -o loop
# sudo cp -rf rootfs/* /mnt/
# sudo umount /mnt
7. Verify
7.1 Start Qemu
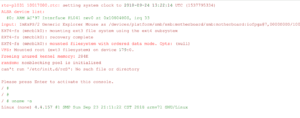
Run the following command to test, check if the compiled kernel can run successfully
# sudo qemu-system-arm -M vexpress-a9 -m 512M -kernel ~/qemu/zImage –dtb ~/qemu/vexpress-v2p-ca9.dtb -nographic -append “console=ttyAMA0”
Or using Script:

In the above test, the kernel will report panic, suggesting that we lack the root file system.

The above problem is due to the busybox tool generated inn the x86 environment.
We used make install when install busybox, so you should use
| make ARCH=arm CROSS_COMPILE=arm-linux-gnueabi- install |
The compilation tool generates the busybox tool used by the arm platform
# file rootfs/bin/busybox
rootfs/bin/busybox: ELF 32-bit LSB executable, ARM, EABI5 version 1 (SYSV), dynamically linked, interpreter /lib/ld-, for GNU/Linux 3.2.0, BuildID[sha1]=cbcd33b8d6c946cb19408a5e8e714de554c87f52, stripped
7.2 Verify again
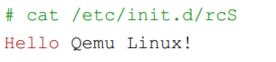
Now, Qemu has started the Linux kernel and mounted the file system successfully, and can interact with the system with simple functions through the serial terminal. The problem of not being able to run /etc/init.d/rcS in the printing process, you only need to add the /etc/init.d/rcS file. The content of the file can be a prompt statement.
7.3 Exit QEMU
Two ways to exit qemu
* In another terminal input: kill all qemu-system-arm
* In Qemu input: Ctrl+ A; X
QEMU: Terminated
8. Start the Linux kernel through u-boot
Embedded system usually include: u-boot, kernel, rootfs, and appfs. The positional relationship of these parts on the ARM development board shown in the figure below
| BootLoader | BootParameters | Kernel | Rootfs | Appfs |
Rootfs can run in board or PC
8.1 Prepare U-boot
8.1.1 Download u-boot
https://ftp.denx.de/pub/u-boot/, we use: u-boot-2021.01.tar.bz2
# tar -jxvf u-boot-2018.09.tar.bz2
8.1.2 Compile u-boot
# vim Makefile
CROSS_COMPILE = arm-linux-gnueabi-
# vim config.mk
ARCH = arm
# make vexpress_ca9x4_defconfig, error

Need : sudo apt install bison
sudo apt install flex
then: # make -j4 error

Need : export CROSS_COMPILE=arm-linux-gnueabi-
export ARCH=arm
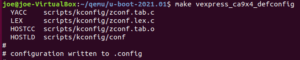
again: # make vexpress_ca9x4_defconfig
# make -j4
8.1.3 Test, start u-boot
![]()
$ sudo qemu-system-arm -M vexpress-a9 -m 512M -kernel u-boot-2021.01/u-boot –nographic
8.2 Kernel configuration compilation
Use u-boot to boot the kernel image:
Need to compile the kernel into uImage format,
Need to specify the load address of uImage in memory
Specify when compiling the kernel: make LOADADDR=? uImage -j4
# cd /home/joe/qemu/linux-4.4.157
# make LOADADDR=0x60003000 uImage -j4
After u-boot compilation is finished, a mkimage file will be generated under the tool folder, copy this file to the bin folder under the cross compiler directory.
![]()
![]()
$ cd qemu/linux-4.4.157
![]()
Error:

$ sudo apt install u-boot-tools
![]()
Get uImage
![]()
9. QEMU network function settings
When the Qemu virtual machine starts on u-boot, uImage needs to be loaded into the memory, and uImage can be downloaded to the specified address in the memory through the TFTP server.
9.1 Check whether the host kernel supports the tun/tap module
![]()
// Install the two tools that the bridged network depends on
# sudo apt install uml-utilities bridge-utils
Create tun device file: /dev/net/tun (usually created automatically)
Modify the /etc/network/interfaces (configure the network, restart to take effect)
# sudo vim /etc/network/interfaces
| auto loiface lo inet loopbackauto enp0s3 // name of virtual network cardauto br0iface br0 inet dhcpbridge_ports enp0s3 |

9.2 Reboot
# reboot
Then check Qemu’s network environment

The virtual network port br0 is the network port for the communication between the Qemu virtual machine and the Linux host.
10. Install TFTP server
Create a TFTP server to download uImage to the memory when launching uImage for the Qemu simulation development board
10.1 Install tftp tool
$ apt-get install tftp-hpa tftpd-hpa xinetd
10.2 Modify the configuration file and set the TFTP server directory
| # sudo vim /etc/default/tftpd-hpa
…… TFTP_DIRECTORY=”/home/joe/tftpboot” …… |
10.3 Create a tftp directory on the Linux host
# mkdir /home/joe/tftpboot
# chmod 777 /home/joe/tftpboot
10.4 Restart the tftp service
# sudo /etc/init.d/tftpd-hpa restart
10.5 Set kernel startup parameters in u-boot
copy uImage and cexpress-v2p-ca9.dtb to tftpboot
![]()
Start Qemu to verify
$ sudo qemu-system-arm -M vexpress-a9 -m 512M -kernel u-boot-2021.01/u-boot –nographic -net nic,vlan=0 -net tap,vlan=0,ifname=tap0 -sd rootfs.ext3
Now, the rootfs directory is a simple root file system, which can be made into a mirror file, and the mirror file can be burned to the development board, or the Linux kernel can be started by u-boot in Qemu and mounted on the mirror file. It can also be set to boot via NFS network file system.
11. Mount NFS file system
11.1 Install and configure NFS service
11.1.1 Install
$ sudo apt install nfs-kernel-server
11.1.2 Configutation
$ sudo mkdir /home/joe/qemu/rootfs
$ sudo chown nobody:nogroup /home/joe/qemu/rootfs
$ sudo chmod 777 /home/joe/qemu/rootfs
$ sudo nano /etc/exports
Add: /home/joe/qemu/rootfs *(rw,sync,no_root_squash)
Restart nfs server:
$ sudo /etc/init.d/nfs-kernel-server restart
Or: $systemctl restart nfs-kernel-server
Check whether the NFS shared directory is created
$ sudo showmount –e
When using the NFS network file system, the Linux host needs to close the system firewall, otherwise, abnormalities will occur when the system is running.
Conclusion
Hopefully, with the help of this blog, you know more about QEMU. All the techniques demonstrated above were used in various submissions to our program. There’s not a single, fixed way to emulate with QEMU. Explore different techniques and see what works for you. Familiarize yourself with the knowledge and you will be surprised at how it can help you in unexpected ways.